(広告)本ページはアフィリエイト広告を利用しており、プロモーションを含みます
VirtualBox上のCentOS7でSambaを構築し、基本操作をしてみようと思い、備忘録として残しておきます。
Sambaはフリーソフトウェアで、Sambaを利用すると、Linux上のディレクトリをWindowsと共有してファイルサーバのように利用できる、というような感じでとらえています。
VirtualBoxのCentOS7にSambaを構築
イメージ図のような形でshareディレクトリを共有してファイルのやりとりを行うようにしようと思います。
shareディレクトリをノートPCのWindows10とやりとりして、ファイルを共有できるようにできるのがゴールです。
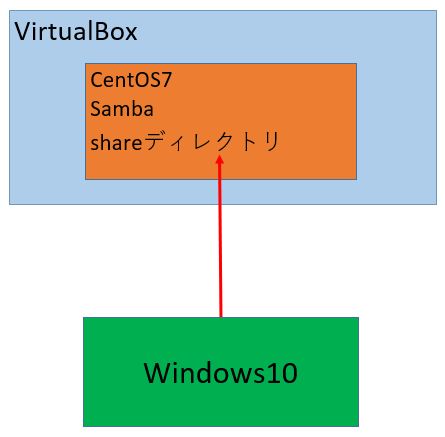
イメージ図
Sambaのインストール確認
まずはsambaがインストールされているが確認します。
rpm -q samba
[root@centos701 ~]# rpm -q samba
パッケージ samba はインストールされていません。
[root@centos701 ~]#
Sambaのインストール
yumコマンドでインストールします。
yum install samba samba-common
インストール完了後に再度rpmコマンドで確認します。
[root@centos701 ~]# rpm -q samba
samba-4.10.16-20.el7_9.x86_64
[root@centos701 ~]#
samba用のユーザを作成しておきます。(sambauser)
すでに存在しているユーザがいる場合はそちらで問題ないと思いますが、分かりやすいようにsamba用のユーザを作成しました。
[root@centos701 ~]# useradd sambauser
[root@centos701 ~]#
[root@centos701 ~]# passwd sambauser
ユーザー sambauser のパスワードを変更。
新しいパスワード:
よくないパスワード: このパスワードは辞書チェックに失敗しました。 - (逆順の)辞書の単語に基づいています
新しいパスワードを再入力してください:
passwd: すべての認証トークンが正しく更新できました。
[root@centos701 ~]#
共有用のディレクトリを作成して、権限を設定します。
mkdir /home/sambauser/share
chmod 0777 /home/sambauser/share/
chown nobody:nobody /home/sambauser/share/
ls -l /home/sambauser/share
追記
/home/sambauser配下のフォルダを共有フォルダとしていたのですが、WindowsからIPでアクセスすると、sahreフォルダというのが自動で作成されていたので、/home配下のshareディレクトリを作成して、共有フォルダとしました。
mkdir /home/share
chmod 0777 /home/share/
chown nobody:nobody /home/share/
ls -l /home/share
SELinuxが有効化されている場合、無効化しておきます。

追記
firewallの設定もする必要があるようなので設定しました。
まずは、firewallを確認します。
firewall-cmd --list-all
[root@centos701 samba]# firewall-cmd --list-all
public (active)
target: default
icmp-block-inversion: no
interfaces: enp0s3
sources:
services: dhcpv6-client ssh
ports:
protocols:
masquerade: no
forward-ports:
source-ports:
icmp-blocks:
rich rules:
sambaを許可します。
firewall-cmd --add-service=samba --permanent
firewall-cmd --reload
[root@centos701 samba]# firewall-cmd --list-all
public (active)
target: default
icmp-block-inversion: no
interfaces: enp0s3
sources:
services: dhcpv6-client samba ssh
ports:
protocols:
masquerade: no
forward-ports:
source-ports:
icmp-blocks:
rich rules:
[root@centos701 samba]#
sambaの設定
sambaの設定は、/etc/samba/にある、smb.confで設定をしていきます。
まずはファイルをバックアップしておきます。
cp -p /etc/samba/smb.conf /etc/samba/smb.conf_`date +%Y%m%d`
ファイルの設定をしていきます。
[global]のworkgroupをSAMBAからWORKGROUPに変更します。
WORKGROUPの部分は、sambaに接続するWindowsの各環境に合わせて変更します。
共有フォルダの設定をしていきます。
pathの部分に共有フォルダのパスを指定します。
[share]
path = /home/sambauser/share/
browseable = yes
read only = no
[share]
path = /home/share/
browseable = yes
read only = no
/home/shareに修正して、最終的に以下のようなファイル内容になりました。
[root@centos701 home]# cat /etc/samba/smb.conf
# See smb.conf.example for a more detailed config file or
# read the smb.conf manpage.
# Run 'testparm' to verify the config is correct after
# you modified it.
[global]
workgroup = WORKGROUP
security = user
passdb backend = tdbsam
printing = cups
printcap name = cups
load printers = yes
cups options = raw
[homes]
comment = Home Directories
valid users = %S, %D%w%S
browseable = No
read only = No
inherit acls = Yes
[share]
path = /home/share/
browseable = yes
read only = no
[printers]
comment = All Printers
path = /var/tmp
printable = Yes
create mask = 0600
browseable = No
[print$]
comment = Printer Drivers
path = /var/lib/samba/drivers
write list = @printadmin root
force group = @printadmin
create mask = 0664
directory mask = 0775
sambaユーザの追加
pdbeditコマンドでsamba用のユーザを追加できるようです。
追加前に確認してみます。
pdbedit -L
pdbeditのオプションに-aでユーザを追加します。
pdbedit -a sambauser
パスワードが聞かれるので、パスワードを入力します。
再度、確認してみます。
[root@centos701 samba]# pdbedit -L
sambauser:1000:
追加したユーザが表示されました。
sambaを起動します。
systemctl start smb
起動を確認します。
systemctl status smb
[root@centos701 samba]# systemctl status smb
● smb.service - Samba SMB Daemon
Loaded: loaded (/usr/lib/systemd/system/smb.service; disabled; vendor preset: disabled)
Active: active (running) since 土 2023-01-07 20:57:43 JST; 28s ago
Docs: man:smbd(8)
man:samba(7)
man:smb.conf(5)
自動起動も有効化しておきます。
まずは確認します。
[root@centos701 samba]# systemctl is-enabled smb
disabled
[root@centos701 samba]# systemctl enable smb
Created symlink from /etc/systemd/system/multi-user.target.wants/smb.service to /usr/lib/systemd/system/smb.service.
[root@centos701 samba]#
[root@centos701 samba]# systemctl is-enabled smb
enabled
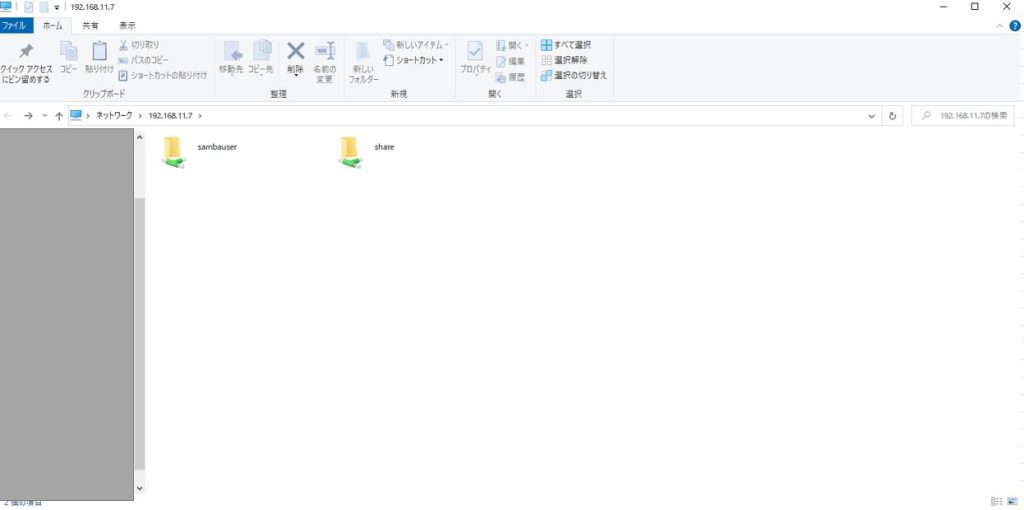
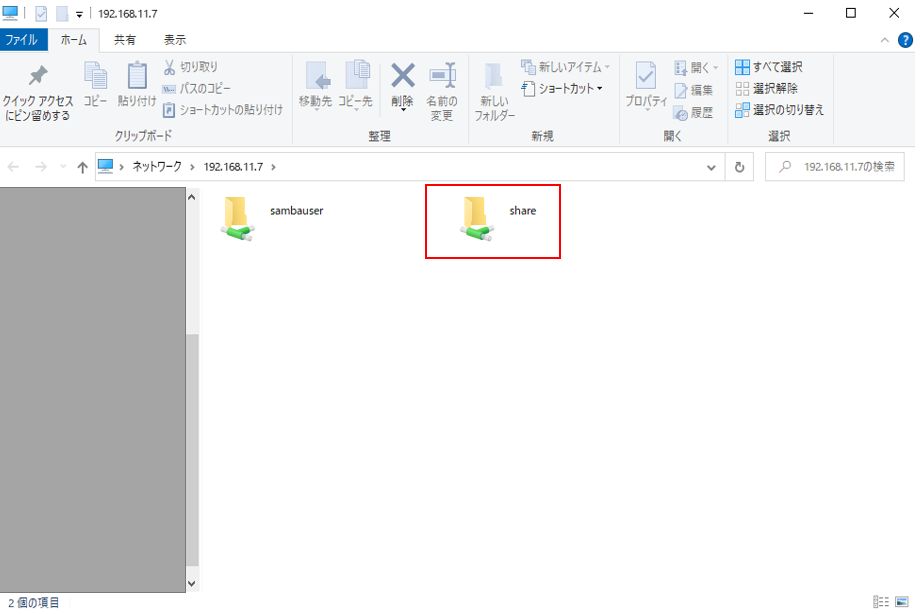
Windowsのエクスプローラーなどから接続してみました。
sambaをインストールしたIPを指定すると、無事接続できました。
実際に運用する際にはIPの制御など細かいコントロールが必要となると思いますが、個人で学習するだけなのでこれでOKです!